Not sure how to install laminate flooring? In this guide we'll take you through the general process of installing your laminate floor. The technical details may change based on the room or the specific laminate used so it is essential to refer to the manufacturers' guidelines before you go ahead. Links to these can be found at the bottom of this page.
Before you install your laminate it will need to acclimatise. This is as simple as leaving them in their box in the middle of the room for 48 hours. The room should be kept at a steady, normal temperature.
When acclimatising your laminate make sure you leave it in its box, in the room that you are going to install it in. The temperature should remain ‘normal’ for that room whilst the flooring acclimatises.
Make sure the subfloor is as clean as can be. Sweep, vacuum and wash the floor before leaving it to dry. It must also be level, which means less than 3mm deviation over a 1m area.
Remember, installing your laminate will involve a lot of kneeling, so we strongly recommend using padded knee pads. We also recommend safety goggles and dust masks for when sawing boards and ear defenders if using power tools.
Acoustic Underlay
Our Acoustic underlays are designed to absorb the sound of footsteps and prevent sound from travelling through the floor. This is a great choice for upstairs.
Thermal Underlay
Whilst all underlays will offer a certain level of thermal insulation, our thermal underlay is specifically designed for the job. This is great if you want to make the most of your heating.
Underlay for Underfloor Heating
If you're installing over underfloor heating, you won't want to stop too much of the heat from trying to get through. We have specially designed paperfelt and foam underlays which give a thin layer of protection without blocking the heat.
DPM (Damp Proof Membrane)
If you're laying your floor over concrete or water-based underfloor heating, you'll need an underlay with a Damp Proof Membrane. This stops moisture travelling up from the ground and soaking your floor from underneath.
Laying Laminate Underlay
Once the surface is prepared, you can apply your underlay to the entire floor area. Place the roll at one end of the room and unroll from the wall. Simply use scissors or a knife to trim at the opposite end. Continue across the room, making sure the edges meet but don't overlap as this will create an uneven floor. If your underlay includes a Damp Proof Membrane (DPM) it's important for this to overlap as it's larger than the rest of the underlay. It's best to leave a 10mm gap around pipes, but make sure the DPM reaches slightly up the wall to protect the edges of the boards.
Tip: You want to avoid boards less than 60mm wide at the edges of your room (that is width, not length). The best way to do this is to measure the width of your room and divide that by the width of your board. This will tell you how many boards wide the room is, and will tell you how wide the last board will be. If it's less than 60mm, cut your first board slightly thinner so that both boards are wider than 60mm.
-
Start in a corner, working left to right. Place the end with the short tongue against the wall. Use expansion spacers along the wall to easily keep the 10mm expansion gap. This gap will cater for the natural shift in size through seasons and temperatures, and without it your lamainate flooring could become damaged.
-
Lay the next laminate board, fitting the tongue and groove design together. Consult the manufacturer's guidelines for any information on specific locking mechanisms. Carry on until the end of the row.
-
If the last board of the row is too long to fit, you'll need to cut it to size. To accurately measure the board to the exact size of the gap, turn it 180 degrees and lay it next to the previous board (remember to use an expansion spacer). Use a tri- square and pencil to draw a line across the board level to where it meets the previous board. Now, cut the board to size and fit in the end of the row with the freshly cut side facing the wall.
-
For both stability and style, it's best to keep the ends of the boards at least 30cm apart. If the off-cut board from the previous row is longer than 30cm, use this as the first board of the second row with the freshly cut side facing the wall. However, if it's too short, simply cut a new board in half and use that. The ends of boards should be at least 30cm apart.
-
For most makes of laminate flooring, you will need to fit long edges together at 30 degrees from the floor before lowering it and locking it in place. The boards should then slide together. However, please consult the manufacturer's guidelines as different boards have different locking mechanisms.
-
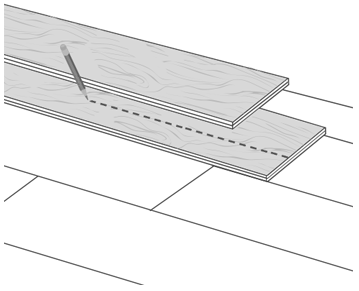
If the last row needs to be cut lengthways, lay the planks as pictured. The line you draw along the edge of the top plank is where you need to cut the middle plank to fit against the wall.
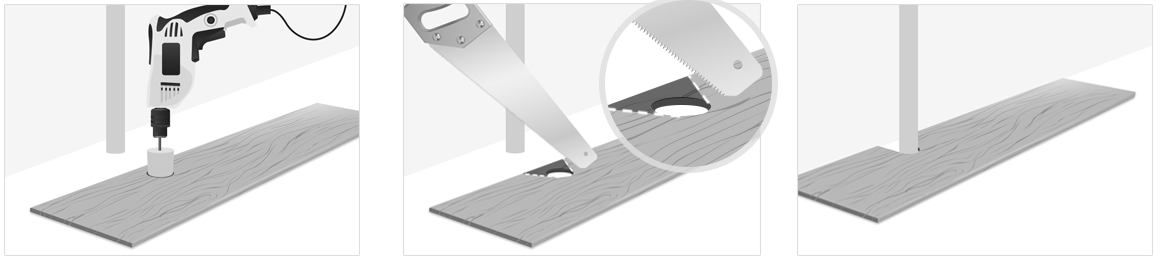
Fitting Laminate Around Pipes
If you're fitting laminate around any pipes, mark the position of the pipe on the board you're laying. Drill a hole about 16mm larger in diameter than the pipe and make two angle saw cuts from the board edge to the sides of the hole to cut a wedge out of the board. Fit the board and carefully glue the small off-cut wedge behind the pipe.
Trims cover the transition between different kinds of floors. These can cater for gaps between floors and changes in height.
Incizo 5-in-1 Profile
The Incizo 5 in 1 profile is suitable for Quickstep laminate floors. This clever contraption can be applied in 5 different situations. It can bridge 2 floors of the same height, bridge 2 floors of different heights, transition into carpet, cover the edges of the floor and it can even be fitted on stair nosing.
Carpet and Tile Trim
These versatile trims are designed to joint two floors which sit at different heights. This can be tiles, carpet or just thinner floors.
Pipe Covers
Made to match your chosen laminate floor, pipe covers come in two halves and fit around your pipes. The idea is to cover the expansion gap required. We recommend that you glue the two halves together around the pipe, leaving the cover loose on the floor.